Setting up a local kubernetes cluster with Minikube and Hyperkit
Working with GKE or any managed Kubernetes service can be fun but having to constantly update deployments and pods specifications on a remote host can be both time and resource consuming as your cloud bill could grow astronomically.
What if you could try out Kubernetes locally without having to continually update remote deployments? Enter Minikube.
What is Minikube?
Minikube lets you run Kubernetes locally inside a virtual machine. If you plan to develop with Kubernetes regularly or just want to try it out locally, use minikube.
What is Hyperkit?
HyperKit is an open-source hypervisor for macOS. Hypervisors let you create and run virtual machines. Hyperkit is lightweight and requires no need for third-party kernel extensions. It is also optimized for lightweight virtual machines and container deployment.
Hyperkit will only work on a mac, as it is entirely reliant on Apple’s Hypervisor framework. If you are following this tutorial on windows or Linux machine, please consider referring to this page for a list of tools to help you create VMs on your platform.
Installing Minikube
First, check to see if your OS dsupports virtualization. On a Mac, run the following command on your terminal to confirm
sysctl -a | grep -E --color 'machdep.cpu.features|VMX'
If you see VMX appears to be colored in your output, this shows you have virtualization enabled.
Next, install minikube with brew install minikube. Please see the detailed installation guide if you use a different OS.
Installing Hyerpkit
First, run the below command to clone and build hyperkit from source
git clone https://github.com/moby/hyperkit && cd hyperkit && make
Provided the above runs successfully, you will have the resulting binary in build/hyperkit, add that binary to your list of executables using
mv build/hyperkit /usr/local/bin
Start a local K8s cluster with Hyperkit
Create your first local cluster with minikube using the following command
minikube start --driver=hyperkit
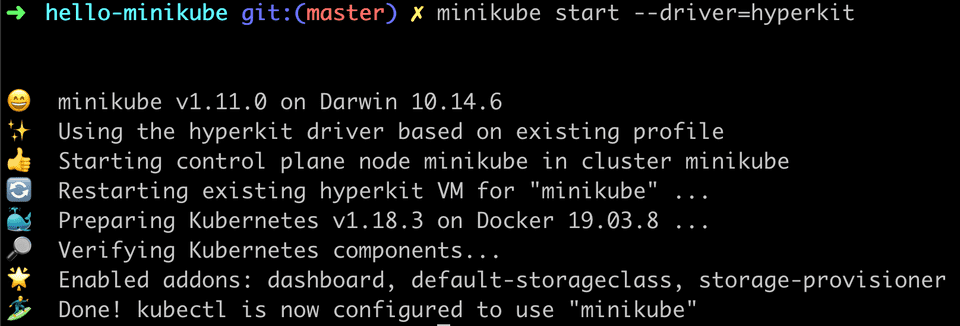
This will start up minikube using hyperkit as your driver. Feel free to replace hyperkit if you are on a different OS. If all is well, your output should be similar to the screenshot below
 Minikube running using hyperkit as driver
Kubernetes is also called K8s derived from the acronym (K-eight characters - S)
Putting it all together
Lets run our first docker container in our local K8s cluster on minikube. We will be using the sample hello-app docker image from the Google container registry. This is image prints hello world using the go programming language. You can find the complete source code here
First, create a deployment using the image. This deploys your container to a pod on the local cluster.
kubectl create deployment hello-minikube --image=gcr.io/google-samples/hello-app:1.0Next, create a service which will expose the above deployment outside of the local cluster.
kubectl expose deployment hello-minikube --type=NodePort --port=8080Finally, view your app using the command below. This should by default open the app in a web browser.
minikube service hello-minikubeAfter you run the above command you should see an output similar to this in your terminal. You can also visit the url in the table to see the running container
| NAMESPACE | NAME | TARGET PORT    | URL                       |
|-----------|------|----------------|---------------------------|
| default   |      | hello-minikube | http://<YOUR_IP>:<YOUR_PORT> |
Wrapping it up
Proceed with deleting all created resources in your cluster.
Delete all K8s objects
kubectl delete service hello-minikube
kubectl delete deployment hello-minikube
Stop and delete the minikube vm
minikube stop
minikube delete
Thanks for reading